Basic Makeup Tutorial Step by Step


Putting on
a fresh, pretty face of makeup is actually quite an art. If you want it to,
makeup can do magical things, completely transforming your face, or simply
enhancing your features.
Makeup may do magical things, but it doesn't have to be a mystery. Applying a
basic, natural look doesn't require a lot of skill or tools. You can do lots of
the blending with your fingertips, and choose to leave out certain products if
they don't appeal to you.
So have no fear: enjoy the process and your fresh,
glowing face Makeup tutorials are a
great way to learn tricks of the beauty trade. With a few tools, some practice,
and the ability to blend in makeup with your fingertips, you’ll be a makeup pro
in no time. Even if you’re just a beginner, you’ll find these tutorials to be
simple and thorough.
Start with clean skin:

Wash your face for 30 to 45 seconds with a
dime-size amount of cleanser. That's how long it takes to clear dirt and oil
off your face.
Apply
Moisture before makeup:

This will keep your
skin from getting too oily during the day, and will help moisturize any dry
patches on your skin. If you know you have oily skin doesn’t skip moisturizer
entirely,instead try a gel based formula that your skin will absorb quickly.
Wait five minutes
before putting on foundation so that the moisturizer can sink in.
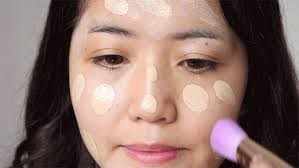
Apply Foundation with the foundation
brush:

Spots with your fingers
to your forehead, cheeks, nose and chin, then blend with foundation brush,
Pro tip:
Use a foundation brush and
apply the foundation starting in the center of the face and blend out. Blend the foundation with a rolling motion and
press it into the skin.when it comes to choose a formula, look for
something that looks natural, has a flawless finish, and feels weightless.
Put a little concealer under the Eye:

One of my favorite tips to hide unwanted dark
under eye circles is using liquid foundation first before applying an undereye
concealer," says celebrity makeup artist Geller
Use a small
pointed brush to dot a bit where under-eye circles are darkest, usually at the
inner and outer corners of the eye. Add a speck to other blemishes that aren't
covered by the foundation and blend into the skin
Last step: Sweep on a light, oil-absorbing
setting powder to set your concealer in place so that it lasts all day,,
Use translucent powder for proper blending foundation and
concealer :

Apply
it to your whole under-eye area and face with a translucent powder, ideally using a velvet-y powder puff. Rolled the Beauty Blender across your face in a
pressing motion until the powder melted into foundation
Start your eye Makeup:

Apply Eyeshadow:
Run eye shadow brush over light
color. Start with two colors: a neutral color and a darker shade.apply light shadow to lid. Run brush over darker color, tapping to remove excess apply dark shadow to crease.Set with a thin dusting
of translucent powder...
If you're using a
brush, tap it lightly on the side of the eye shadow case to remove any excess.
Apply Eyeliner:
Eyeliner pencils
are easy to apply because you use them as you would any other pencil. You can
lightly apply the pencil for a subtle, natural look, or you can smudge your pencil
to create smoky or dramatic eyes. It also won't run into your eyes like liquid
liners can.
If
you want to use eyeliner as a kajal deponds on your choice
When
using a pencil liner, you will need to occasionally sharpen or dull your pencil.

Curl Your Lashes:
Place a lash curler at the
base of your upper eyelashes (along the lid) and press for five seconds.
Apply Mascara:
Apply to the upper and lower lashes with the tip of the wand oriented towards the outer corner of your eye.one coat should suffice for this look.
Apply blush on your cheek:
Blush on is applied according
to Face shape just because every face shape is different with other cannot be applied same method for applying blush on here
are some different method to apply blush on...

Oval faces - sweep your blush over your
cheekbones. You can easily find your cheekbone with your fingers - aim to place
the colour just above the bone rather than towards the hollow beneath it to
help raise the height of your cheekbone.
Heart shaped faces - because your face can
appear pointy, we need to soften the edges so it appears more like an oval.
Apply blush to the outer corner of your cheekbone, starting by your ear and
ending at a point below the outer corner of your eye. Also add a touch of colour
by your temples, towards the centre of your forehead, to help balance the width
of your forehead with your chin.
Square faces - your cheekbones are the same
width as your chin, so to help define them apply your blush slightly below the
cheekbone. Blush in the hairline will help soften the edges of your face.
Round faces : Try sweep your blush from the ear down the cheekbone
towards the mouth. Add a little touch of blush to the chin and blend it well to
make your face appear longer.
Long faces: Apply blush on cheekbones
below the outer corners of the eyes and blend well. Be sure the blush never
extends lower than the tip of the nose.
Triangular faces - Blush should be
applied in a sideways V on the cheekbones. Blend up from your cheekbones to
your temple and then extend the blush over your brow a bit toward the center of
your forehead. This will help to balance the width of your forehead with the
rest of your face.
Apply lipstick:
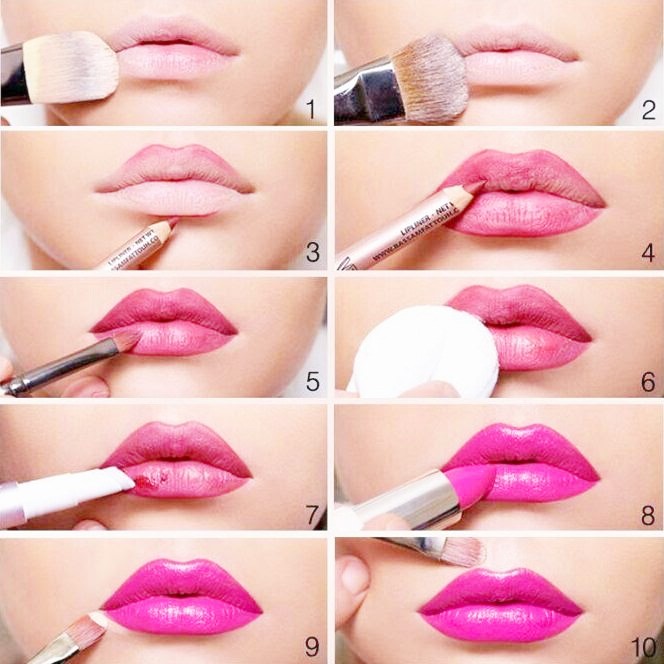
Apply lip balm. Dot your lip with lip balm to smooth them and
reduce crevices. ...
Use a lip liner. Choose a color that matches your lips, not your
lipstick. ...
Apply
lipstick. Pick up the lipstick and apply the color, starting at the center of
the upper lip and moving outward toward one corner.
Bring the lipstick back to the center and run it outward
toward the other corner. Repeat with the lower lip. To fill in any missing
color, dab the lipstick with your pinky, and then dot the color onto your lips
with the finger.
Blot your Lips:

To blot, which will make
lipstick last longer and keep it off your teeth, take a facial tissue and fold
it in half. Hold it in two hands, with the fold facing you, then bring it
between your lips and press your lips together gently. Release. To make
lipstick last even longer, dust a little powder on the tissue before blotting.
Tip: Avoid deep reds if you have thin lips. They tend to make lips look smaller.
Tip: Avoid deep reds if you have thin lips. They tend to make lips look smaller.
In last check yourself in
bright light - daylight if possible - to make sure everything is blended and
beautiful. You're done!
If you like to say anything regarding this, then
please do mention it in the comments section. It belongs to you all. Always
feel free to contact with us. And share it as well
For Get more Related Topics click the below links:
How to get glowing and fair skin How to Reduce wrinkle at home
How to get Acne free Skin How to tighten skin naturally
How to look 10 years younger and Beautiful
How to get glowing and fair skin How to Reduce wrinkle at home
How to get Acne free Skin How to tighten skin naturally
How to look 10 years younger and Beautiful
Comments
Post a Comment